To generate content for Trainz, you need a 3D modelling program. The traditional programs used for this modelling are 3DS Max (a commercial program that costs serious money), Gmax (a freeware cut down version of 3DS Max that is rather buggy and no longer supported), or Blender (another freeware program with a rather incomprehensible user interface). Personally I use Gmax and put up with it's foibles, I've tried Blender, but other than simple import and export, I can't make it do a thing.
Many people find the Sketchup 3D modelling program much easier to use than Gmax, 3DS Max or Blender, and would like to be able to use this for creating Trainz models. Additionally, there is a large amount of content on the Sketchup 3D Warehouse (now under new ownership and renamed the Trimble 3D warehouse) that is currently unavailable in Trainz. In spite of some other peoples claims about the licensing conditions of such content (for instance that it may be ONLY be distributed on the Auran/N3V DLS), the terms of service of the Trimble 3D Warehouse are quite clear :
Rights granted to other end users of the Services. You give other end users of the Services a perpetual, sublicensable, irrevocable, worldwide, royalty-free, and non-exclusive license to reproduce, adapt, modify, translate, publish, publicly perform, publicly display and distribute Existing Geolocated Models, Existing Non-Geolocated Models, New Models and related content and derivative works thereof which you submit, post or display on or through, the Services.
So you are free to convert these models, and distribute the resulting Trainz models as you please, although obviously out of simple good manners if nothing else, the original author should be credited.
Up until very recently, anyone looking to convert a Sketchup model into Trainz was advised to either use the professional version of Sketchup which has more file export options than the free version, or to use RUBY Tmix, which although it does a conversion, does not generate an efficient Trainz model, and does not allow you to further edit the model after export. The first method is expensive, and the second generates very inefficient models. It is also possible to export from Sketchup as a Collada DAE file, import this into Blender, then re-export to 3DSmax, then import that into Gmax (there are also other different but similar file conversion possibilities ). However, the end result is normally unsatisfactory, with either the scaling, or the texturing, or both being corrupted in the process.
I became tired of rescaling and re-texturing converted models very quickly, and after much searching around the web, I came across a freeware program that makes a satisfactory conversion from Sketchup to Gmax possible. Believe it or not this was found on a Microsoft Flight Simulator site - they use Gmax too apparently. It isn't perfect, having a few interesting 'features', but it saves 99% of the work previously involved in such a conversion. What follows is (hopefully) an easily followable tutorial that should enable anyone to get their model from Sketchup into Gmax and thence into Trainz. For the purposes of this tutorial we are concentrating on building a scenery object to keep things as simple as possible, but the same principles apply to any other asset, locomotives and rolling stock included.
Well first of all obviously you will need a Sketchup model to convert, either one of your own, or one from the 3D Warehouse, and you will need a copy of Sketchup itself. Download and install it from the link below. Be warned that being originally a google product, once installed it will autoupdate itself without your permision or knowledge.
Trimble 3D warehouseFor the purposes of this tutorial we will be using a model from the 3D warehouse, the Fulham Railway Bridge by Chigrinsky.
Fulham Railway Bridge Sketchup ModelTo perform the file conversion you will need the following program
ModelConverterXThis will download a Zip file that you will need to unzip to a directory of your choice, and then make a Shortcut to it, there is no installer.
And to convert the textures you will need part of the Flight Simulator Software Development Kit (SDK)
FS2004 SDKThis will download a file "terrain_sdk_setup.exe" which you will have to run to install the toolkit.
You will now need to set up ModelConverterX, so that it knows where to find the Flight Simulator SDK. Run it up, and select the rightmost tab Options
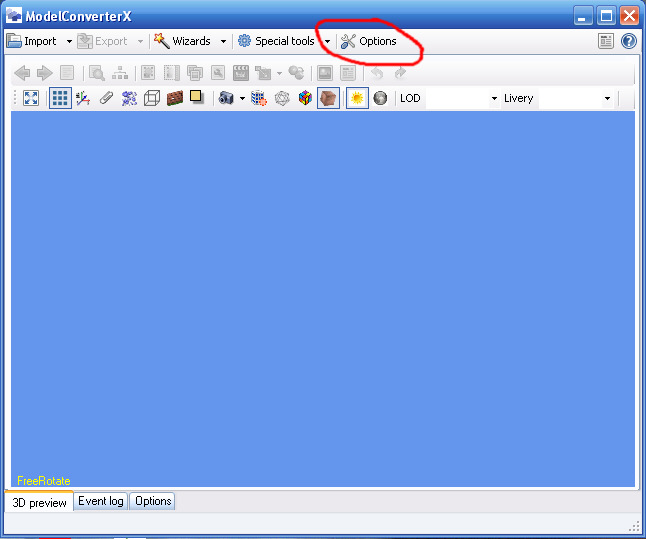
You now need to select Texture Settings in the lefthand window.

And now in the box titled 'ImageToolPath' you have to enter the path to where you installed the SDK. If you used the default settings that should be C:\Program Files\FS2004SDK\TERRAIN_SDK\Terrain_Tools\imagetool.exe
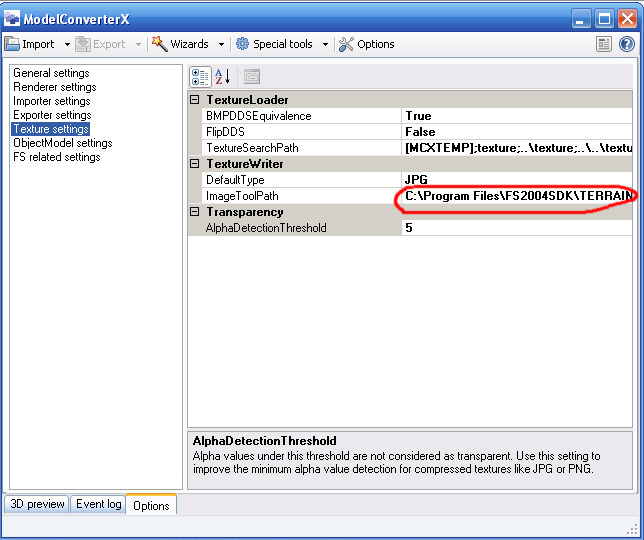
Once you've done that, you can close ModelConverterX. There is no need to save anything, it's done automatically.
And lastly if you haven't already got it, you will need Gmax, and the Trainz exporters for it. I was going to refer you to Paul Hobbs' excelent guide on how to download and set up Gmax, but I see that it has been removed from his website, so you're on your own until I can write a similar guide. You don't need to install the Tempest Game Pack (unless of course you want to develop content for Quake).
Gmax V1.2
When you first run up Gmax you will be asked to register it with
Turbosquid. When registered, they will email you an activation code to
allow you to use Gmax. If you ever have to re-install Gmax, you will
find your original activation code will not work, and you will be
expected to re-register with Turbosquid.
TIP : If you set your computer Date & Time to the day you received your activation email, Gmax will allow the use of your old activation code (don't forget to change the time & date back again afterwards).
The objective of this first section of our tutorial is to export our example model from Sketchup and to produce a Google E arth File (*.KMZ) from it, which can then be further processed in the next section.
First things first, so you will need to start Sketchup and read in our example file. Either using Sketchup's File | Open menu, or just double click on the "Putney.SKP" file we are using as an example, from Windows Explorer. To see the details of our model you will need to click Window | Model Info.

This should then pop up a little window giving the details of the model loaded as follows

Note that there are 50 Component Instances and 53 Groups in the model. For a succesfull conversion, these cannot be allowed to remain as they are. and must be exploded. Close the Model Info box and zoom out with the mouse scroll button until the whole model can be seen, then select everything by clicking and draging a selection box around the entire model. At this point you will notice that two selection boxes are drawn around parts of the model using a thick line. One in blue selects the outermost layer of the bridge itself, the other in red selects the Google Earth image. If you are using a different model there may be more objects selected. The red selection is "locked", and we first need to unlock it by right clicking on it, and from the context menu that springs up, select Unlock (it should be the fourth option down). The border around the map should then turn from red to blue, showing that it is now unlocked. The border round the bridge should stay selected, if it doesn't you will have to drag a selection box round everything again.
Right click on either of the selected objects, and from the context menu that springs up, select Explode. Some of the objects should then be shown with a pale blue dotted pattern, but there will be some showing a solid blue border again, showing thet there are further levels of grouping or component definitions that need to be exploded. Again right click on an object (you may want to zoom back in a little with the scroll wheel) and select explode. Keep going like this until there are no groups left to be exploded, (the option will be greyed out when you click on the last object) it should take about 5 or 6 explodes. At each level remember the right click MUST be on one of the selected objects, or you will loose your selection and have to select everything again, and note that if you have a very large model (or a slow PC), it may take a long time to process each explode (minutes even).

Now you are ready to do the actual exporting. Select File | Export | 3D Model... and you will get a standard Windows file save menu. Select your filename and the location to save the exported file. There are two options in the Export type box, namely "Google Earth File (*.kmz)" and "COLLADA file (*.dae)". The default option of a .KMZ file should be used.

At the conclusion of all that you have succesfully exported you model file and can close down Sketchup. It will probably ask you if you want to save your model - you can if you want, but there's no need, and it may ask if you want to put it on the 3D Warehouse. Answer no to that one, as the model is already on the warehouse.
At this point in our tutorial we have already exported our model to a "*.KMZ" file, and we will now convert that file into a "*.3DS" file that can be read by 3DS Max or Gmax.
So firstly run up ModelConverterX from the shortcut you made earlier. Selecting "Import" will bring up a standard Windows File selection window. Select the KMZ file that you created in the previous section, and click Open. Now just wait a bit while it imports the model - it may take a little time depending on how fast your PC is.

Having imported your model, you will be able to zoom in and move around it using the mouse, have a quick look and check that it's all there, and that nothing has gone wrong so far. The program will automatically delete what it considers as unused polygons, but there seems to be a bug, which on some models can cause the deletion of real surfaces. There's nothing you can do about it, but just make note that it has happened, so you don't think later on that you accidentally deleted them yourself.
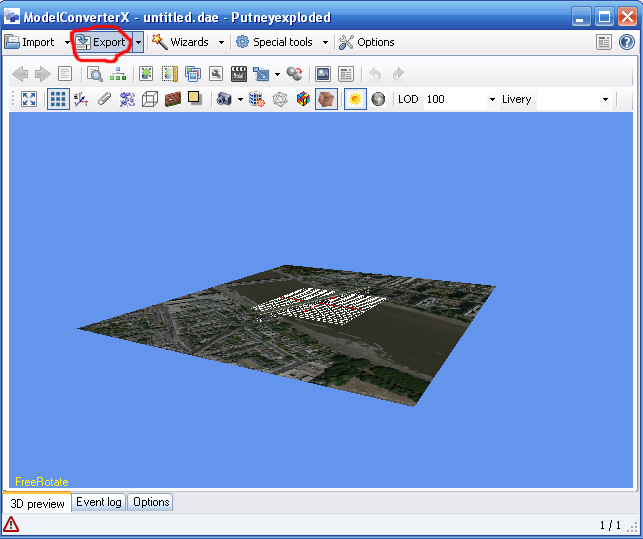
Now select Export and you will again get a standard Windows file menu. Leave the "Save as Type" set to 3DS Max object (*.3DS), and select a filename and location for your output file. I would advise you to use a seperate directory for each converted model, so that each model's textures may be kept with the model. When you click on Save, it will pop up a little reminder about copyrights (see the bit earlier about T&Cs of the content on the 3D Warehouse), and then proceed to export your model. Be warned this can take a LONG time. Don't close ModelConverterX once it has finished exporting, as you still need it for the next bit ...
Trainz requires that all textures have dimensions that are powers of 2 (2, 4, 8, 16, 32, 64, 256, 512 etc), Sketchup does not, and indeed most aren't nice sizes that we can use straight off. It is therefore essential that the textures are at least checked, and we need to extract them from the KMZ file anyway. Happily, Flight Simulator has similar restrictions on texture sizes, so ModelConverterX is set up to do the donkey work for us. This is how it works :

Click the Mass Texture Editor icon, and the following menu should come up, giving you the options to convert and resize the textures. You will need to change the Texture folder to the location you put your 3DS file, as you want the textures with your model. The filetypes on the right should be changed from whatever it has defaulted to, so that each one matches the filetype of the corresponding name on the left. Failure to do this will result in Gmax not being able to pick up the correct texture name later. When you've picked the correct texture types for each one (don't forget the ones you have to scroll down to find), click the Update button at the bottom. A green progress bar will zip across the Texture Folder box, and the window will then update again. Normally at this point we would be finished with the texture conversion, but as can be seen from the screenshot, there is a bit of an oddity in this case. For some reason, a number of the texture files have an extension of sailboat2, which is not recognised, and these files have not been processed.

In this particular example, we will have to process the remaining texture files by hand. I have no idea why these textures have this particular extension - googling this file extension produces no results, and I have come across no other Sketchup model with this problem. We could have used a simpler example, but the following technique is useful to know in case you do have problems.
You will need to use Windows Explorer to navigate to the folder where you put the KMZ file that you exported from Sketchup. A copy of the KMZ file should be made, and then the copy should have it's file extension changed from name.KMZ to name.ZIP (KMZ files are just ZIP files, but with particular contents in the ZIP). Windows will give you a dire warning at this point that what you are doing will cause the end of the world. Tell Windows to do it anyway, and the world will not end, nor will your files be corrupt. You can now use Windows Explorer to examine the ZIP file (right click the zip file and click explore). You will find the texture files inside the zip file in subdirectory models\untitled (they are always in that directory for any model). Copy out the files with the ".sailboat2" extension into the same location as your other texture files and your 3DS file. The sailboat2 files are actually just JPG files after all, as you will find out when you open them in a graphics program. Use whatever graphics program you have to open each of these files in turn, resize them to a power of 2, and resave them, but with a JPG file extension. You could even use Paint if you haven't anything better. You will find that all but one of these textures are identical, being 70 x 171 pixel images of the support pillars. Change these to 64 x 128, the one exception is texture_10 which is 122 x 67, change this one to 128 x 64.
OK, now to the moment of truth. Open up Gmax, click through the usual "Do you want to visit the website" screen, and instead of using File | Open as you would normally do, use File | Import. A standard Windows file window will open, make sure that the Files of Type is set to 3D Studio Mesh (*.3DS,*.PRJ), and select the 3DS file you converted earlier.

When you click Open, a new window will open giving a few options

As long as you haven't been editing anything else in Gmax it doesn't matter what you click here, but to be safe it's probably better to click the Completely replace current scene option. When you click OK, the file should be imported and you will see the following :

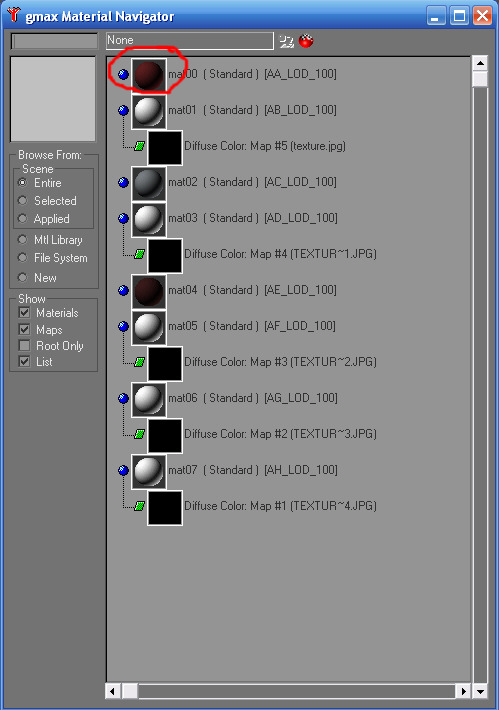
Note that at this point, although we can see the model, it is not yet textured. Firstly click on the "Material Navagator" icon, then double click on the first material (mat00). The "Material Editor" window will open, showing the properties for mat00. To make this material visible we need to click the blue & white chequered ball icon. If you now look closely, you will see that the fence on the nearside of the bridge is now showing a texture (although at this point the gaps between the rails are not transparent). Double click on the next material in the Material Navigator (mat01), the Material Editor will show the properties for mat01, and again click the chequered ball icon. Repeat this process for ALL the materials (you will have to scroll down to find some of them) even the ones that just show a blank black ball icon, but don't touch the Diffuse Colour icons (not yet anyway). As you turn on each texture, you may notice that in the Material Navigator window, the small blue balls to the left of the materials change to small red balls.


If you have done that bit correctly, the entire model should now be showing textured except for the bridge support pillars which will still be showing white - that's because of those 'sailboat2' file extensions earlier. However we aren't out of the woods yet, as the texture paths are not properly set up. If you tried to export this as it is, none of the textures would be found by the exporter, not just because of those funny filenames seen in the Material Navigator. Scroll back to the top in the Material Navigator, and double click on the first material's Diffuse Colour map (Map #22). The material Editor will now show the details of this map. Before going on to select our texture file, you should select the "Mono Channel Output" to "Alpha" by clicking the radio button shown - you can only do this for the textures with a PNG extension, as the JPG ones don't have an alpha channel. You then need to click on the Bitmap: box, where the map is currently given as "texture.png". A further window will then open allowing you to select a bitmap image.

Chances are that at this point the file select window will be pointing to a totally different directory to the one you want. Use the Look in: dropdown menu to navigate to the directory where you put your model. Once you have it pointing to the correct directory, you should see an image of the texture. In this case, the filename is already correct, but for most files that won't be the case as the 3DS file format only allows for DOS type 8.3 character filenames. In that case just select a filename by clicking a file in the main window. When you select a file it's name will appear in the filename box, and it's image will appear in the image box. If you clicked on the correct name, the image in the image box shouldn't change. If the image did change, you've got the wrong file, try another. If you forget what the correct image looked like, just click Cancel, and repeat the process. When you've managed the first one, you have to repeat this process for each of the Diffuse Colour Maps in the Material Navigator. Note that a couple of the textures are used for more than one material. When you've done all the ones that don't show a plain black image, it should be obvious where the textures we had to hand convert, with the .sailboat2 file extension go. If you assign these also now, the model should look fully textured.


Selecting the correct texture file is reasonably easy if you only have a few textures, but for cases where there are many, there is another method of getting the filenames, but it involves using DOS. You will need to open a DOS window (I believe it's called "command prompt" now). On Windows XP it can be found at START\All Programs\Accessories\Command Prompt - the Icon is a black square with "C:\" in it. You should then navigate to where you stored your texture files by using the "cd" command, for example "cd My Documents\Sketchup\Arnos Grove". Now type the command "dir /x" and it will list all the real filenames with their shortened equivalents. Type "Exit" when you're finished to close the window.


You can see here the strange filenames, and their real equivalents. This should allow you to select the correct name (most of the time), but unfortunately there is a bug in ModelConverterX that can get some of the filenames wrong under some cirumstances. It only normally happens if there is an excesive number of texture files. If it occurs, some of the filenames will NOT match any entry in the DOS directory listing. In this case, an equal number of textures whose names begin TEXTUR~ will also be assigned the wrong texture. It shouldn't be too hard to work out which is which by trial and error, as only a few of the textures are affected.
OK that's nearly it. The only thing left is to sort out the transparency on the railings and bridge sides (the textures with a PNG file extension). Parts of these need to be transparent, so we need to add an opacity map. Go back to the Material Navigator, scroll to the top and double click the material mat00 again. In the Material Editor, if no maps are shown, click the + at the top of the maps tab to expand it. Now click and drag the texture we have as Diffuse Color to the slot marked Opacity. A small box will open, asking if you want a copy of the map or an instance - select instance and click OK. You will now see the railings actually have holes between the bars, which is what we want. You will need to repeat this process for the other PNG texture mat01, which is used for the bridge lattice sideframes. You may notice that the railing on the other side of the bridge does not use a PNG texture, but a JPG, so you can't make the spaces between the rails transparent. (Well you can, but you will have to edit the texture to produce a transparency layer and then save it as a PNG or a TGA - I leave that as an exercise). If you haven't already saved your Gmax file, now would be a good time.
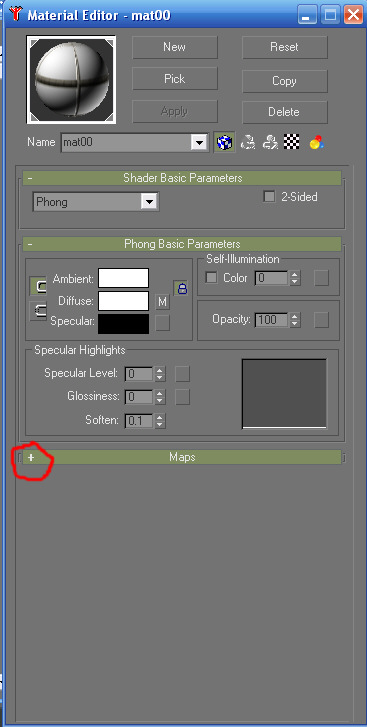


Although this particular model does not use them, a great many models use solid colours, for which no texture maps are provided. In theory, Trainz ought to be able to cope with these as the Gmax exporter will generate the correct "m.notex" convention, but unfortunately it does not work (at least in TRS2004 and TRS2006). So for each solid colour we have to make a texture file (if there are lots of these we can combine them later on when we optimise the model).
To create the texture file you will need a graphics program that is cabable of generating colours from an RGB recipe (even MS Paint can do that!). You should create an image whose size is a power of 2, the easiest and most efficient is going to be 1 x 1 pixels., so create an image that big.
We now need to find the colour that we need to colour our texture file. Double click on our first solid colour in the Material Navigator (you can see that it has no texture map). The Material Editor will now show the colour - notice that the ambient and diffuse settings are not white as is normal if a texture is used. Double click on the colour patch for ambient (or diffuse - they are linked to be the same), and the Color Selector will open, showing you exactly what the colour is - in this case the RGB settings are 92, 31, 32. You need to make a note of the colour settings, and make the texture file you are creating that colour, then save it in the same directory as the other textures for your model. Give it a sensible name such as Colour1.bmp, as you may end up with a lot of these. It wouldn't be a bad idea to make a little note somewhere of the colours you use in each texture file - a text file created with Notepad would be ideal.


Now we need to point Gmax to the texture file you just made, but first we must remove the colour from the ambient slot. In the Colour Selector set the RGB values to white (255, 255, 255) and close the Color Selector window. The colour patches in the Material Editor should now show white. If your models are ending up a little too bright, the ambient can be set darker than pure white - you should apply this change to all the textures in a model, not just the solid colours. I normally use 210, 210, 210 which tones down the colour a little (Trainz always seems to display too bright anyway).


Expand the Maps tab in the Material Editor (if it isn't already) and click on the Diffuse Color entry (which should say None at this point). A Material Navigator window will open showing two icons - Bitmap and Checker. You need to double click on the Bitmap icon. A file selection window will then open - find your texture Colour1.bmp, or whatever you called it, and then click Open. If you remembered to click the chequered ball, then the appropriate part of your model should be showing the correct colour (again), but this time from a proper texture.
You will need to repeat this process for each of the solid colours in your model (obviously give them different names - they can't all be Colour1.bmp)
OK, we now have our model in Gmax, all properly textured. We now need to get it into Trainz. Some of the details of this may vary slightly depending on your version of Trainz, but we will try to cover a method that SHOULD work for any version.
Although our model is now all hunky-dory, the Trainz Exporter still isn't going to like it. If you try to export right now, it will complain that each object in the scene has no texture mapping. We must go through each object in the game and give it a map. Click on the Select by Name icon, and a selection window will open. Just highlight the first object, and press select. You should now be able to see the name of our selected object in the box on the right of the screen about halfway down.


At the moment we are still in create mode, so click on the Modify icon to enter modify mode
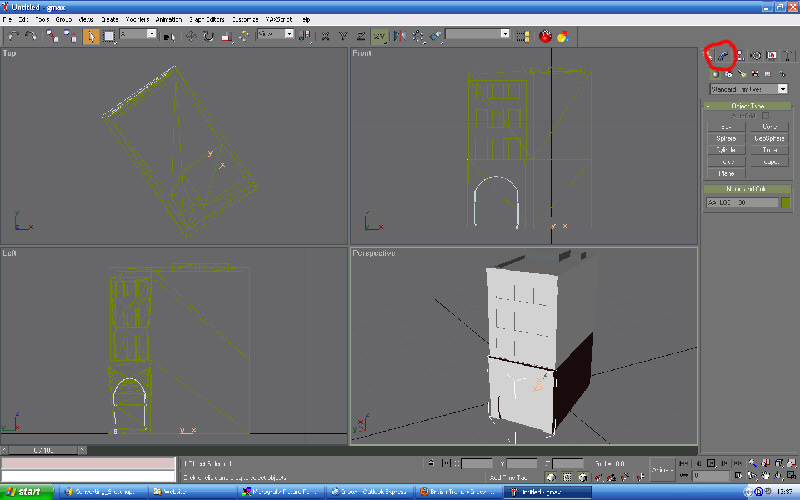
We now need to add a modifier to our selected object - click the dropdown menu marked Modifier List, and select Unwrap UVW from the menu that opens up. You should now see the modifier in the little window below the modifier list (it's called the stack). Easy wasn't it. Now you have to select each of the other objects in turn, and add an Unwrap UVW to each of them. When you've finished don't forget to save your model again.


Our model is now ready to export, so we must sort out a place to export it to. Using Windows Explorer, or whatever your equivalent is, create a new directory. To make life simple create it in the root directory C:\, and call it Trainz_Model (you could call it whatever you like, and put it wherever you fancy, but lets make it simple for anyone who hasn't done this before) In this new directory you need to create a file called "config.txt", and with a text editor put the following in it :

You will need to enter values for the KUID number - the XXXXXX should be your user id given to you when you registered your copy of Trainz (you did register your copy didn't you?), the YYYYYY is a number of your choosing - if it's you first asset you can use 1 (But each asset you create should have a different number). Fill in the appropriate bits for the description, username (what you the user want to call your object), and author. You could add lots more to your config.txt, but we are trying to keep this as simple as possible.
OK we're ready to export now, so back to your Gmax session. When you export your model you need to have nothing selected, otherwise only the selected object will be exported. To make sure nothing is selected, just click in any of the four view windows on a bit of clear grey background (do it again in the same window just to be sure). Now select File | Export.
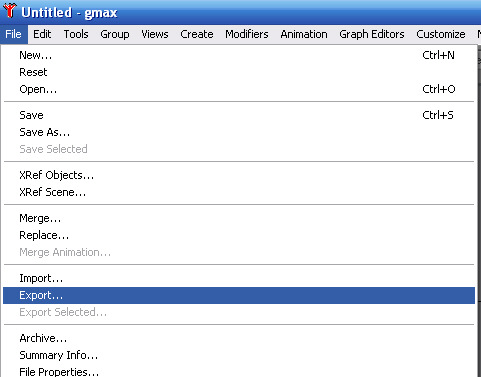
A file selection window will open. Check that the Save as Type is set to "Trainz Format (*.IM,*.KIN,*.PM)". Now navigate to the directory you just created "C:\Trainz_Model", and then enter default.im as the filename.

When you click Save, your file will be exported. If you followed this tutorial correctly, you shouldn't get any errors. If you look in your Trainz_Model directory, you will see that a number of new files have been created, the one called default.gmw is not needed and can safely be deleted. The only thing you need now is your texture files in this same directory. Gmax can do this for you. Click the Utilities icon (the little hammer) and the utilities menu will open, click on Resource Collector.


We need to tell the Resource Collector where to put the textures, it already knows, but for some reason the output path always shows as Gmax's Autoback directory. Just click on the Browse buton to open a File select window. Note that this already shows your Trainz_Model directory, so just click Use Path in this window. Now just click the Begin button at the bottom of the Resource Collector, and the texture files will be copied into the correct directory.


That's it, we're done. The model should now be in a format that Trainz can handle.
If you have TRS2004, then you need to copy your Trainz_Model directory into whatever_your_trainz_path_is\TRS2004\World\Custom\Scenery. If you have TRS2006 or later, then you will need to run up your Content Manager and ask it to Import Content, then select the Trainz_Model directory as the model to import. You will then need to commit your model, hopefully you will have no errors. Now you can go into Trainz and try out your new object in Surveyor.
Well if you got this far, then congratulations, especially if this is your first time at this sort of thing. You may be happy that you have succesfully got your model into Trainz, and wish to go no further. That's fine, but I'm sure that some may wish to go further. A straight conversion as we have just done can produce a fairly inefficient model in Trainz, and with too many like that you may find your frame rates dropping. Luckily it isn't too hard to improve the performance of converted models. We're only going to concentrate on quick fixes here - you can do a few things that will take minutes, and give a very substantial performance increase. It is possible to squeeze an awfull lot more performance out of most models, but you are talking weeks of work, not minutes.
The first technique to improve the performance of an object in Trainz is to minimise the number of textures used. In our example of the Fulham Railway Bridge, there are 20 textures which is fairly high for a trainz model. Each of these textures adds a performance hit to Trainz equivalent to 200 polygons. If you look at the texture files in our example (and this is very, very common with Sketchup models), you will see that a fair number of the texture files are actually identical.
Texture_3 and Texture_5 are identical
Texture_15 and Texture_16 are identical
Texture_6, Texture_7, Texture_8, Texture_9, Texture_11, Texture_12, Texture_13 and Texture_14 are all identical
It is very easy to take Texture_3, and Apply it to the object using Texture_5, likewise for the other identical textures. The redundant textures can then be safely deleted. If you do this for all the duplicates above you will have reduced the number of textures from 20 down to 11, and it will probably take you less time to do it, than for me to type this. If you were feeling confident, it wouldn't be too difficult to combine some of the remaining textures into a single texture file, and getting down to 2 or 3 textures ought to be fairly easy. When you have finished, you will have to re-export your model and the textures (using Resource Collector)
Although JPG and PNG image files offer a very small file size, the fact that they are compressed means that every time Trainz loads one of these files it must spend time decompressing them again. A considerable performance gain can be easily achieved by converting the texture files to either BMP or TGA formats (TGA files must be stored uncompressed). If you convert the texture formats, you will need to let Gmax know about it using the Material Editor, and then re-export your model, and the textures also (using Resource Collector).
If you use the Polygon Counter (it's under Utilities), you can see that the basic model of the Fulham Railway Bridge converted straight from Sketchup weighs in at a fairly hefty 8420 polygons. One of the foibles of Sketchup is that it tends to texture the inside of objects as well as the outside. If you examine the bridge support pillars, and the caps above the pillars, you will find that the insides of these objects are indeed textured. All these extra polygons can be deleted as they can never be seen. You may as well delete the google earth image the bridge sits on as well (and that will save another texture). This should bring the polygon count down to 7186, which is still large, but a significant improvement for only a few minutes work. It wouldn't be too hard to get another very substantial improvement by simplifying the tops of the support pillars. There are 16 of these, so if you managed to save say 100 polygons on each, which shouldn't be too hard, that would be a saving of 1,600 polygons.
Hopefully this tutorial has given you a few ideas, and encouraged some of you to have a go. Be warned though that content creation can become addictive, and soak up large amounts of your time.
Page updated : 19 Dec 2015